Widget Documentation for Desktop & Web
Learn how to implement BitLabs Widgets to your web app.
Why Widgets?
We have seen that Widgets can add extra revenue for our partners, and we strongly recommend adding them to your web app in order to drive more traffic to surveys. Once your offerwall integration has been done, adding Widgets is not a lot of work, and we do encourage you to take this extra step.
How to set up Widgets
Widgets are complementary to the offerwall you are already using, so you will not have to create a new app on the BitLabs dashboard for this to work. The colors will automatically be synced with your offerwall so that the widgets fit your web app perfectly.
Initial Set-Up
For any widget to work you will need to add our script to either the head or the end of the body section of the page you want to display our widgets on.
<!--Adding the BitLabs Script to your <head> Section-->
<script type="module" src="https://sdk.bitlabs.ai/bitlabs-sdk-v1.0.0.js"></script>
<link rel="stylesheet" href="https://sdk.bitlabs.ai/bitlabs-sdk-v1.0.0.css" />
Adding a Widget
You can add one or multiple widgets as shown in the following code snippet.
<!--Add this Script to your DOM-->
<script>
   function initSDK() {
     // Replace YOUR_APP_TOKEN with your API token from the dashboard, insert USER_ID dynamically for each user
     window.bitlabsSDK.init("YOUR_APP_TOKEN", "USER_ID").then(() => {
		// This example will display our Widget "Simple" at the positon of the elemnt with ID: #one
		window.bitlabsSDK.showWidget("#one", "simple", "top-left");
		document.removeEventListener("DOMContentLoaded", this.initSDK);
     });
   }
   document.addEventListener("DOMContentLoaded", this.initSDK);
</script>
.init() Explanation
window.bitlabsSDK.init(token, uid, options) is an asynchronous function and accepts up to three arguments. It returns a Promise with an initial instance Object.
| argument name | type | required | default value | description |
|---|---|---|---|---|
| token | string | yes | The token from your app. | |
| uuid | string | yes | The ID from your user. | |
| options | Object | no | For more options. |
init() options object elements
| option name | type | possible values | description |
|---|---|---|---|
| disableBestSurveyNotification | boolean | true, false | Disables the notification of new best matching surveys. |
| bestSurveyNotificationPosition | string | bottom-left, bottom-right, top-left, top-right | The position where the notification pops up. |
| showFloatingWidget | boolean | true, false | Display a static widget that is always visible in one of the four corners. (default value: false) |
| customFloatingWidgetMessage | string | "example text" | Display a custom message when the mouse cursor is hovered over the static widget. (default value: empty string) |
| floatingWidgetPosition | string | bottom-left, bottom-right, top-left, top-right | The position where the static widget is displayed. (default value: bottom-right) |
| username | string | "username123" | The username the user set on your page. This is used to display the username instead of anonymous in the leaderboard widget |
initial instance object
This initial instance object contains a function called updateOptions() and gets an object as a parameter.
Example usage:
let initInstance;
window.bitlabsSDK.init("YOUR_APP_TOKEN", "USER_ID").then(instance => {
  initInstance = instance;
  initInstance.updateOptions({ disableBestSurveyNotification: false, bestSurveyNotificationPosition: 'bottom-left' });
}
updateOptions() options object
Every option is optional and does not have to be part of the object.
| option name | type | possible values | description |
|---|---|---|---|
| uuid | string | string | The ID from your user. |
| disableBestSurveyNotification | boolean | true, false | Disables the notification of new best matching surveys. |
| bestSurveyNotificationPosition | string | bottom-left, bottom-right, top-left, top-right | The position where the notification pops up. |
| username | string | "username123" | The username the user set on your page. This is used to display the username instead of anonymous in the leaderboard widget |
.showWidget() Explanation
The core of showing a widget is the window.bitlabsSDK.showWidget(elementID, design, position, callback, options) function, which accepts up to five arguments and returns a widget instance object. Each call of this function will create a new widget in order to have more than one widget design on your page (each widget needs its own element ID).
| argument name | type | required | default value | possible values | description |
|---|---|---|---|---|---|
| elementID | string | yes | any elementID | The ID of the Element in which the widget should be displayed. | |
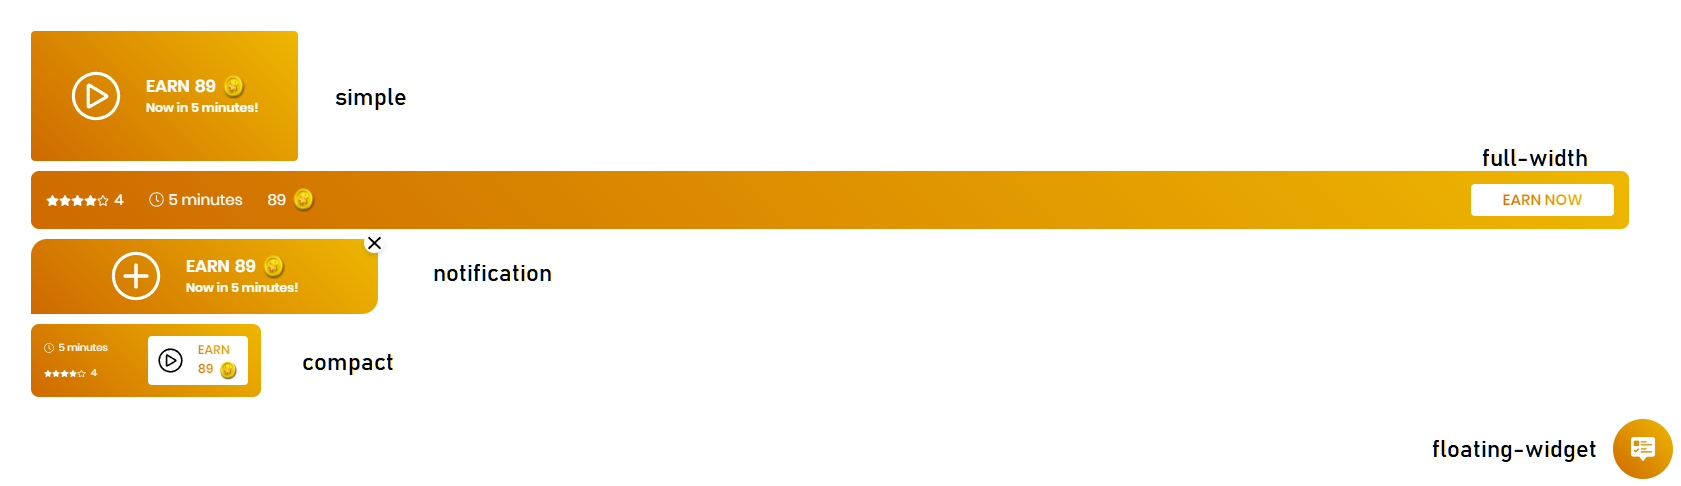
| design | string | no | simple | simple, compact, full-width, notification, earnings, offers | Selection of the widget design. |
| position | string | no | bottom-right | bottom-left, bottom-right, top-left, top-right | Selection of the position where the offerwall should be opened. |
| callback | function | no | () => void 0 | (event-name) => {your code} | A callback function to respond to the events sent by the widgets. Currently "onOfferwallOpen", "onOfferwallClose" and "onWidgetClose". |
| options | Object | no | see options table | For more options. |
showWidget() options object elements
| option name | type | possible values | description |
|---|---|---|---|
| rows | number | 0, 1, 2 | Creates a grid view of the selected widget with up to 2 rows. It is recommended to use this setting only with the design "simple", "compact" and "offers". |
| noFakeSurveys | boolean | true, false | Disables the filling of fake surveys if there are not enough real ones to fill the grid completely. |
| autoWidth | boolean | true, false | Stretches the widgets to fill the missing space in the grid, except "offers". |
| onClick | function | undefined, () => | This function is called when a user clicks on the widget. If this is not provided an offerwall iframe will be opened. |
widget instance object
This initial instance object contains a function called updateOptions() and gets an object as a parameter.
Example usage:
const widgetInstance = window.bitlabsSDK.showWidget('#simple', 'simple', 'top-left');
widgetInstance.updateOptions({position: 'top-right', design: 'compact', rows: 2, autoWidth: true, noFakeSurveys: false, onClick: () => {}});
updateOptions() options object
Every option is optional and does not have to be part of the object.
| option name | type | possible values | description |
|---|---|---|---|
| design | string | simple, compact, full-width, notification, earnings, offers | Selection of the widget design. |
| position | string | bottom-left, bottom-right, top-left, top-right | Selection of the position where the offerwall should be opened. |
| rows | number | 0, 1, 2 | Creates a grid view of the selected widget with up to 2 rows. It is recommended to use this setting only with the design "simple", "compact" and "offers". |
| noFakeSurveys | boolean | true, false | Disables the filling of fake surveys if there are not enough real ones to fill the grid completely. |
| autoWidth | boolean | true, false | Stretches the widgets to fill the missing space in the grid, except "offers". |
| onClick | function | undefined, () => | This function is called when a user clicks on the widget. If this is not provided an offerwall iframe will be opened. |
Available Widgets
See this page for more information about the Leaderboard widget.
Grid Widgets
It is also possible to add a grid of surveys as a widget. This means you can add one or multiple rows of surveys by adding a single widget.
Compact Grid

Example code for the image above
window.bitlabsSDK.showWidget(
        "#compact-grid",
        "compact",
        "bottom-right",
        () => void 0,
        { rows: 2, autoWidth: true }
      );
Simple-Grid

Example code for the image above
window.bitlabsSDK.showWidget(
        "#simple-grid",
        "simple",
        "bottom-right",
        () => void 0,
        { rows: 1, autoWidth: false }
      );
CodePen for Copy & Paste Code Snippets
See the code in action and play around with it in our codepen: