Deprecated - BitLabs React Native SDK
This page will guide you through the integration of our React Native SDK into your app.
Version History
To check the latest version and all the previous ones of the SDK, you can check this page.
Account Set-Up and retrieving your API Key
Before we can get started with implementing the SDK, you should retrieve your API Key for your integration from the BitLabs Dashboard.
Adding the SDK
In your project directory, open a terminal and add:
npm install bitlabsyarn add bitlabsThe SDK requires the react-native-webview and react-native-svg:
npm install react-native-webview

npm install react-native-svg
yarn add react-native-webview
yarn add react-native-svgDirect download
Alternatively, you can download the BitLabs React Native SDK by clicking here.
Using the SDK
Show the Offerwall
Use the <BitLabs /> component to show the Offer Wall/Direct Link. BitLabs will show up and the user will see qualifications or surveys.
<BitLabsOfferWall
  uid='USER_ID'
  token='APP_TOKEN'
  adId={adId}
  onExitPressed={navigation.goBack}
  tags={{ 'my_tag': 'new_user', 'is_premium': true }}
  onReward={reward => console.log(`Reward this time: ${reward}`)}
/>
The props are the following:
- uid: you will need to dynamically insert the user id for each app user. Make sure the id used here is unique and that it does not change, as the user's profile will be stored under this id.
- token: This is where you will need the API key from the dashboard, as you will need to replace "YOUR-TOKEN" with it.
- adId: The advertising Id, we recommend you use this so that the offers make more sense to the user. Default value is empty.
- onExitPressed: The Navigation algorithm which triggers a back press to exit the BitLabs screen.
Navigation SystemThe onExitPressed implies that the BitLabs component is on its own screen. You shouldn't add anything to the screen. In the example above, I am using the react-navigation module as the navigation system. You can use any navigation system you want, just pass the function which triggers an exit screen.
- tags: Additional parameters to the OfferWall, check them here.
- onReward: The callback which receives the reward of the user and executes the behaviour you specify. This callback is invoked when the user leaves the Offer Wall, and the reward is the total reward of surveys the user got since the Offer Wall is opened until it is closed.
Currently, the SDK callbacks only work with surveys. For offers, please use the server-to-server callback instead.
We highly recommend using server-to-server callbacks instead! Please do not use this in apps where the user can withdraw real currency, as it might be exploitable.
However, if your app stores user data locally and does not sync with a server, this would be an option to still use BitLabs to reward your users.
That's it!Theoretically, this is all you have to do. Anything below is optional but can improve the user experience.
List of Survey Widgets
BitLabsSurveys (DEPRECATED)
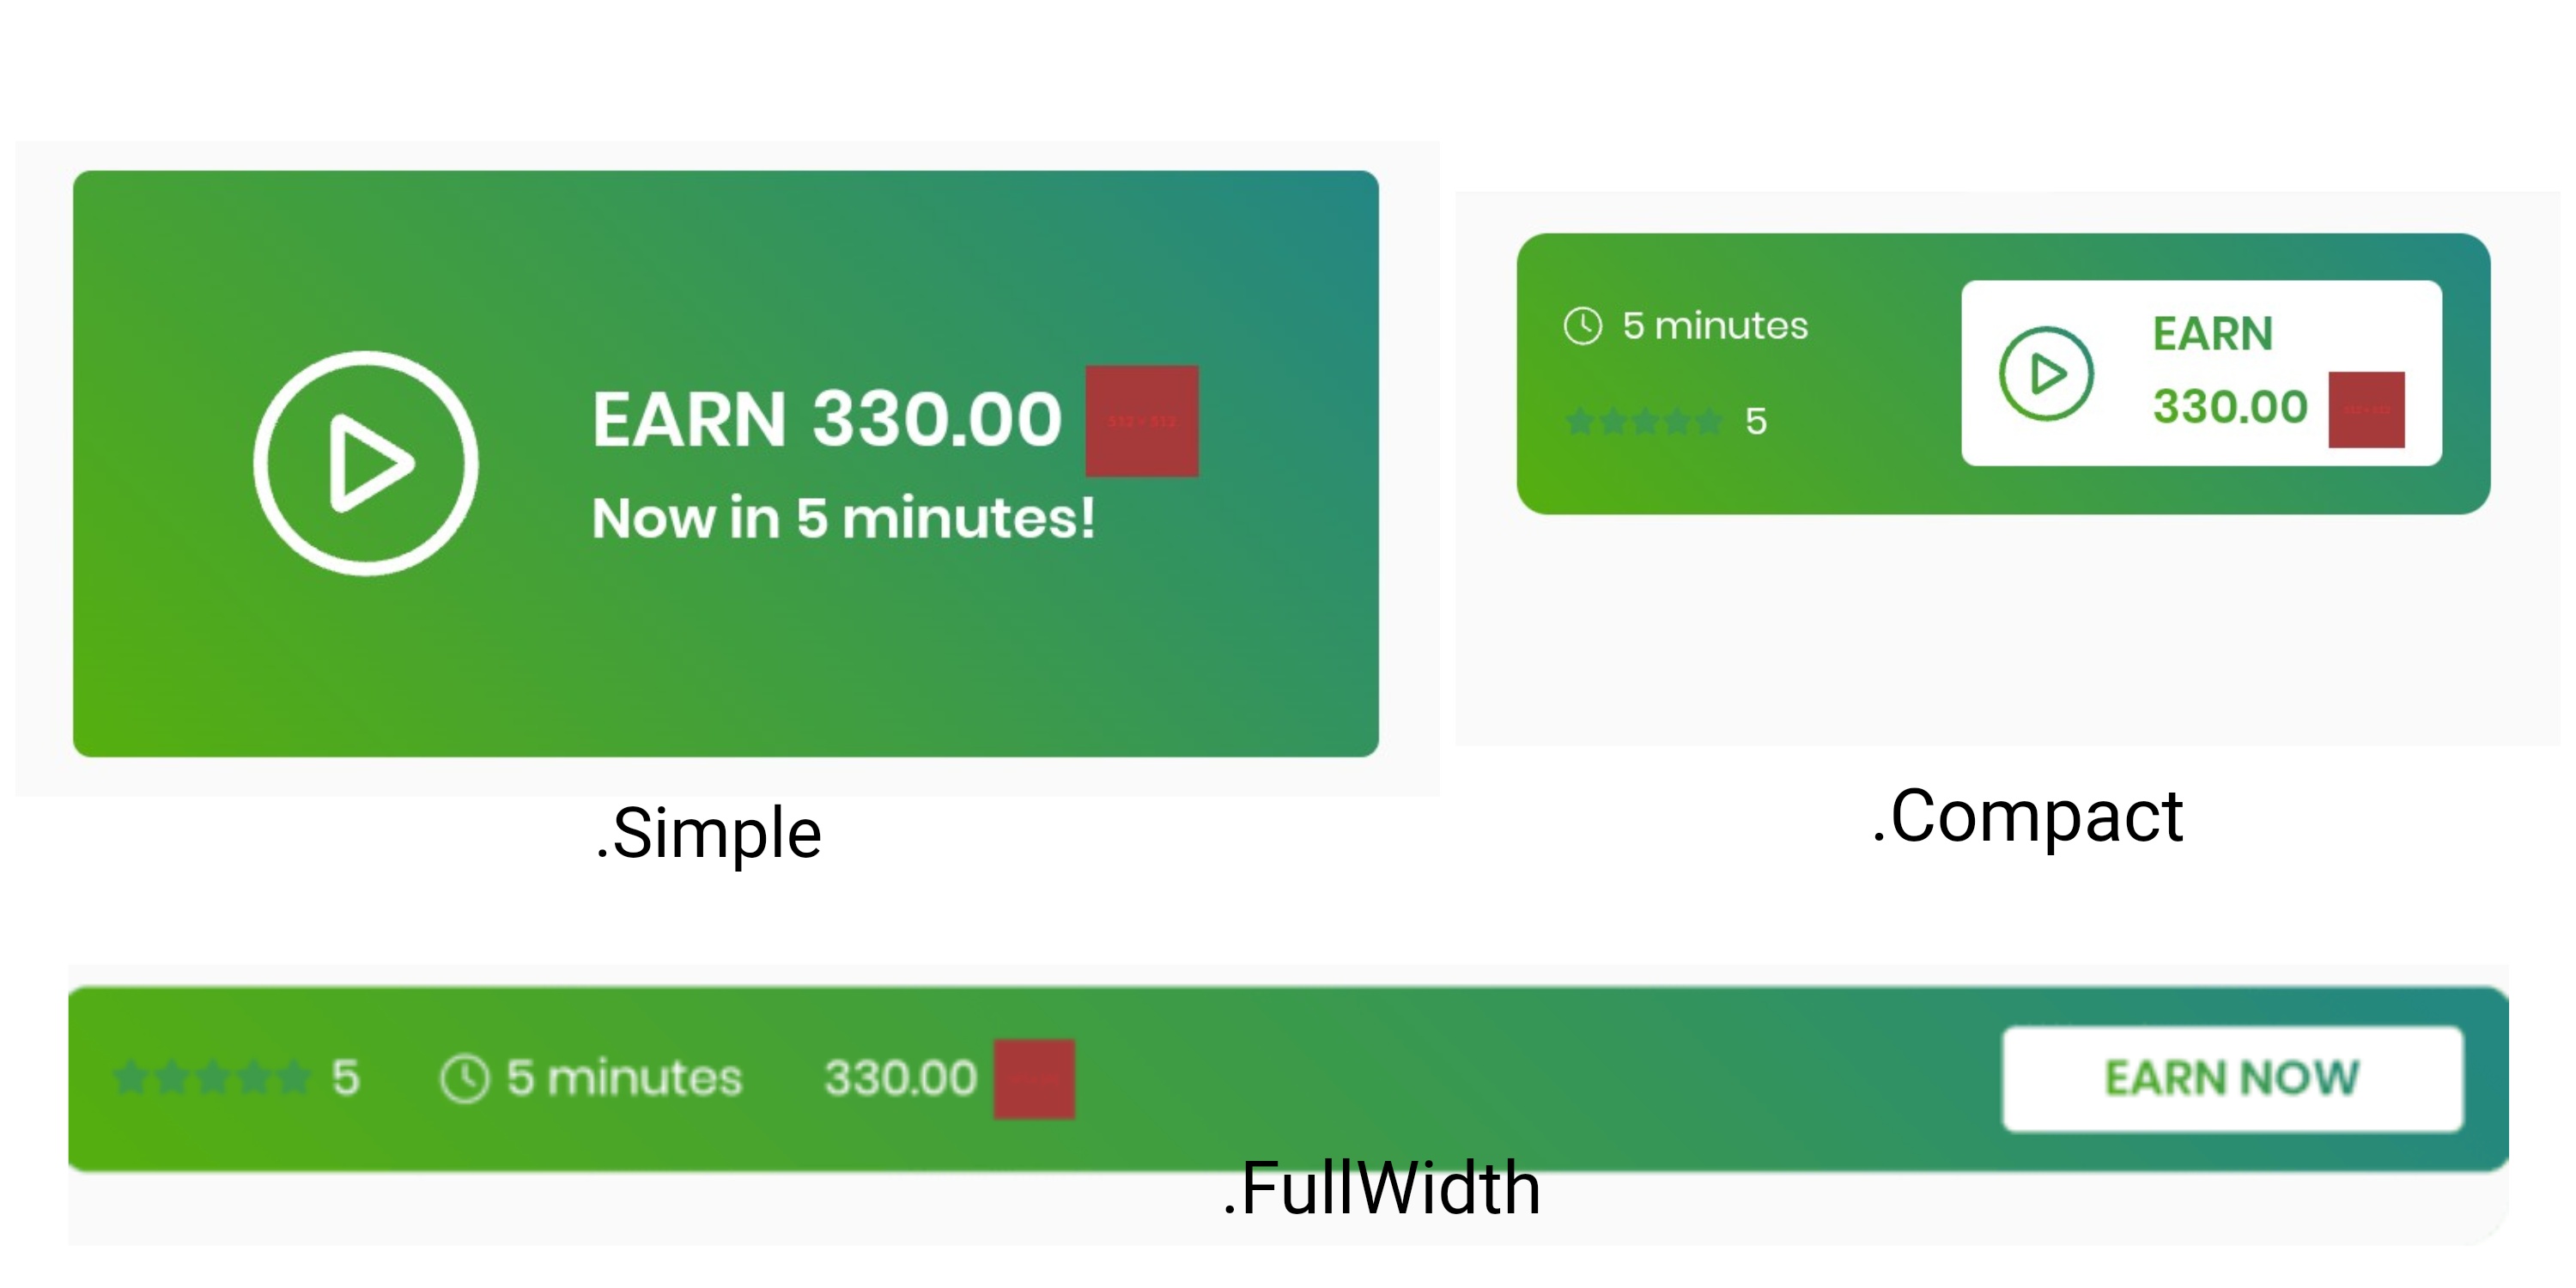
The <BitLabsSurveys /> component shows a horizontal list of survey widgets for the user.
<BitLabsSurveys
  uid={uid}
  token={token}
  type={SurveyType.Simple}
  onSurveyPressed={() => navigation.navigate('Offerwall')}
/>
The props are the following:
- uid: you will need to dynamically insert the user id for each app user. Make sure the id used here is unique and that it does not change, as the user's profile will be stored under this id.
- token: This is where you will need the API key from the dashboard, as you will need to replace "YOUR-TOKEN" with it.
- onSurveyPressed: The function which triggers when one survey among the list is pressed. We recommend that the functionality would be to open the offerwall. In the example above,
react-navigationis used and thus the function navigates to a screen called Offerwall where it shows the<BitLabsOfferWall />component. - type: The WidgetType can be one of three options:

BitLabsWidget
The BitLabsWidget JSX component shows a single survey widget per the specified type of the following:
<BitLabsWidget
  uid={uid}
  token={token}
  type={WidgetType.Simple}
  onPress={() => navigation.navigate('Offerwall')}
/>
Additional Functionality
Check For Surveys - Check if there's something to do for the user
You can use checkSurveys() to check if a survey is available for the user. This function takes two callbacks as parameters: onResponse with hasSurveys, a boolean which is true whenever there's at least one survey or qualification question available for the user. Otherwise, it's false. onFailure with an Exception. The token and the uid are the same ones used previously.
checkSurveys(
  token,
  uid,
  (hasSurveys) => console.log(`[Example] Has Surveys: ${hasSurveys}`),
  (error) => console.log(error.message));
Get Surveys
You can use .getSurveys() to get available surveys for the user. The onResponse callback has a list of The onResponse callback has a List Surveys.
getSurveys(
  token,
  uid,
  (surveys) => console.log(`[Example] Getting surveys -> ${surveys.map((survey) =>
          `Survey ${survey.id} in ${survey.details.category.name}`)}`),
  (error) => console.log(error.message));
A survey has the following properties:
Leaderboard
The Leaderboard widget shows your top 100 earning users and their corresponding earnings in your app's currency. And will open the Offerwall if clicked.
Reward
The rewards shown in the widget are custom to your app and will be paid by us to you and your users. By default these rewards are disabled and not shown so this widget only serves the purpose to display the best earning users. To enable the rewards and incentivise your users to do more surveys and offers in your app please contact us on: [email protected]
The earnings will reset at the end of each month and the top 100 users will get their corresponding reward. If a user is listed in the leaderboard it will see it's rank by the blue (You) besides the username.
All earnings and rewards in the leaderboard will be formatted as your app's settings set on our publisher dashboard.
Username
If you implement the leaderboard without updating your offerwall and widget integration all users will just be called anonymous. To pass us the correct usernames to your provided user id you will have to add a tag with key username before launching the offerwall.
Implementation
BitLabsLeaderboard (DEPRECATED)
<BitLabsLeaderboard
  uid={uid}
  token={token}
/>
BitLabsWidget
<BitLabsWidget
  uid={uid}
  token={token}
  type={WidgetType.Leaderboard} // This is important to show the Leaderboard
  onPress={() => navigation.navigate('Offerwall')}
/>
Whitelist HTTP Domains
Since BitLabs works with a plethora of survey providers, we can't always make sure that the domains are secured with HTTPS schemes. So you need to whitelist some providers if needed.
For iOS:
- Navigate to ctRootDirectory]/ios/[/ios/ctDirectory]/info./info.plist
- Paste the following inside the main <dict>:
<key>NSAppTransportSecurity</key>
	<dict>
		<key>NSExceptionDomains</key>
		<dict>
			<key>samplicio.us</key>
			<dict>
				<key>NSIncludesSubdomains</key>
				<true/>
				<key>NSExceptionAllowsInsecureHTTPLoads</key>
				<true/>
			</dict>
			<key>cint.com</key>
			<dict>
				<key>NSIncludesSubdomains</key>
				<true/>
				<key>NSExceptionAllowsInsecureHTTPLoads</key>
				<true/>
			</dict>
			<key>qualtrics.com</key>
			<dict>
				<key>NSIncludesSubdomains</key>
				<true/>
				<key>NSExceptionAllowsInsecureHTTPLoads</key>
				<true/>
			</dict>
			<key>spectrumsurveys.com</key>
			<dict>
				<key>NSIncludesSubdomains</key>
				<true/>
				<key>NSExceptionAllowsInsecureHTTPLoads</key>
				<true/>
			</dict>
			<key>decipherinc.com</key>
			<dict>
				<key>NSIncludesSubdomains</key>
				<true/>
				<key>NSExceptionAllowsInsecureHTTPLoads</key>
				<true/>
			</dict>
			<key>ssisurveys.com</key>
			<dict>
				<key>NSIncludesSubdomains</key>
				<true/>
				<key>NSExceptionAllowsInsecureHTTPLoads</key>
				<true/>
			</dict>
			<key>lucidhq.com</key>
			<dict>
				<key>NSIncludesSubdomains</key>
				<true/>
				<key>NSExceptionAllowsInsecureHTTPLoads</key>
				<true/>
			</dict>
        	<key>paradigmsample.com</key>
			<dict>
				<key>NSIncludesSubdomains</key>
				<true/>
				<key>NSExceptionAllowsInsecureHTTPLoads</key>
				<true/>
			</dict>
        	<key>focusvision.com</key>
			<dict>
				<key>NSIncludesSubdomains</key>
				<true/>
				<key>NSExceptionAllowsInsecureHTTPLoads</key>
				<true/>
			</dict>
        	<key>vi.ga</key>
			<dict>
				<key>NSIncludesSubdomains</key>
				<true/>
				<key>NSExceptionAllowsInsecureHTTPLoads</key>
				<true/>
			</dict>
        	<key>opinionetwork.com</key>
			<dict>
				<key>NSIncludesSubdomains</key>
				<true/>
				<key>NSExceptionAllowsInsecureHTTPLoads</key>
				<true/>
			</dict>
        	<key>surveyrouter.com</key>
			<dict>
				<key>NSIncludesSubdomains</key>
				<true/>
				<key>NSExceptionAllowsInsecureHTTPLoads</key>
				<true/>
			</dict>
        	<key>opinionbar.com</key>
			<dict>
				<key>NSIncludesSubdomains</key>
				<true/>
				<key>NSExceptionAllowsInsecureHTTPLoads</key>
				<true/>
			</dict>
        	<key>prsrvy.com</key>
			<dict>
				<key>NSIncludesSubdomains</key>
				<true/>
				<key>NSExceptionAllowsInsecureHTTPLoads</key>
				<true/>
			</dict>
        	<key>ptrack1.com</key>
			<dict>
				<key>NSIncludesSubdomains</key>
				<true/>
				<key>NSExceptionAllowsInsecureHTTPLoads</key>
				<true/>
			</dict>
        	<key>globaltestmarket.com</key>
			<dict>
				<key>NSIncludesSubdomains</key>
				<true/>
				<key>NSExceptionAllowsInsecureHTTPLoads</key>
				<true/>
			</dict>
        	<key>eocucom.com</key>
			<dict>
				<key>NSIncludesSubdomains</key>
				<true/>
				<key>NSExceptionAllowsInsecureHTTPLoads</key>
				<true/>
			</dict>
		<key>prodegemr.com</key>
		<dict>
			<key>NSIncludesSubdomains</key>
			<true/>
			<key>NSExceptionAllowsInsecureHTTPLoads</key>
			<true/>
		</dict>
    	<key>swagbucks.com</key>
		<dict>
			<key>NSIncludesSubdomains</key>
			<true/>
			<key>NSExceptionAllowsInsecureHTTPLoads</key>
			<true/>
		</dict>
    	<key>sgizmo.com</key>
		<dict>
			<key>NSIncludesSubdomains</key>
			<true/>
			<key>NSExceptionAllowsInsecureHTTPLoads</key>
			<true/>
		</dict>
    	<key>surveygizmo.com</key>
		<dict>
			<key>NSIncludesSubdomains</key>
			<true/>
			<key>NSExceptionAllowsInsecureHTTPLoads</key>
			<true/>
		</dict>
    	<key>reviewrobin.com</key>
		<dict>
			<key>NSIncludesSubdomains</key>
			<true/>
			<key>NSExceptionAllowsInsecureHTTPLoads</key>
			<true/>
		</dict>
    	<key>questmindshare.com</key>
		<dict>
			<key>NSIncludesSubdomains</key>
			<true/>
			<key>NSExceptionAllowsInsecureHTTPLoads</key>
			<true/>
		</dict>
    	<key>peanutlabs.com</key>
		<dict>
			<key>NSIncludesSubdomains</key>
			<true/>
			<key>NSExceptionAllowsInsecureHTTPLoads</key>
			<true/>
		</dict>
    	<key>marketknowledgesurveys.com</key>
		<dict>
			<key>NSIncludesSubdomains</key>
			<true/>
			<key>NSExceptionAllowsInsecureHTTPLoads</key>
			<true/>
		</dict>
    	<key>dubinterviewer.com</key>
		<dict>
			<key>NSIncludesSubdomains</key>
			<true/>
			<key>NSExceptionAllowsInsecureHTTPLoads</key>
			<true/>
		</dict>
    	<key>confirmit.com</key>
		<dict>
			<key>NSIncludesSubdomains</key>
			<true/>
			<key>NSExceptionAllowsInsecureHTTPLoads</key>
			<true/>
		</dict>
    	<key>survia.com</key>
		<dict>
			<key>NSIncludesSubdomains</key>
			<true/>
			<key>NSExceptionAllowsInsecureHTTPLoads</key>
			<true/>
		</dict>
    	<key>insights.supply</key>
		<dict>
			<key>NSIncludesSubdomains</key>
			<true/>
			<key>NSExceptionAllowsInsecureHTTPLoads</key>
			<true/>
		</dict>
		<key>roirocket.com</key>
		<dict>
			<key>NSIncludesSubdomains</key>
			<true/>
			<key>NSExceptionAllowsInsecureHTTPLoads</key>
			<true/>
		</dict>
	</dict>
</dict
If you want to allow any HTTP request instead, inside the info.plist put the following:
<key>NSAppTransportSecurity</key>
<dict>
  <key>NSAllowsArbitraryLoads</key>
      <true/>
</dict>
For Android:
- Download the whitelist xml.
- Put the downloaded file inside ctRootDirectory]/andro/android/app/src/main/res/xml/
- Inside ctRootDirectory]/andro/android/app/src/main/AndroidManifest.xml put the following:
<Application
             ...
             	android:networkSecurityConfig="@xml/network_security_config"
             ...>
  ...
</Application>
If you want to allow any HTTP request instead, inside AndroidManifest.xml put the following:
<Application
             ...
             	android:usesCleartextTraffic="true"
             ...>
  ...
</Application>
Gaming offers on iOS
To enable gaming offers for SDK integrations on iOS, you need to follow this guide.
Updated 3 months ago
Your next Step
You have now implemented BitLabs with your project. If you haven't done it already, it is time to configure server-to-server callbacks and the look and feel of your app.