BitLabs Android SDK
This page will guide you through the integration of our Android SDK into your app.
CHANGELOG
To check the latest version and all the previous ones of the SDK, you can check this page.
What's new in this page:
Since v5.1.0
- Add Deep Linking
Since v5.0.0
- Add Maven Central dependency coordinates.
Since v4.0.0
- Deprecate Widgets and Leaderboard.
- Deprecate the old way of initialisation and introduce a new one.
Account Set-Up and retrieving your API Key
Before we can get started with implementing the SDK, you should retrieve your API Key for your integration from the BitLabs Dashboard.
Direct download
You can download the BitLabs Android SDK by clicking here.
Adding Dependency
Maven Central (Recommended)
In your app build.gradle file, add the following:
dependencies {
    // Other dependencies...
    implementation 'com.prodege.bitlabs:core:5.1.0'
    // Other dependencies...
}If you are migrating from the Jitpack coordinates, then you can remove the repository block that adds Jitpack as a repo(given that you don't use other Libraries served by Jitpack).
JitPack (Will be deprecated soon)
Add the following code above the dependencies section of your app-level build.gradle file:
repositories {
   maven {
       url 'https://jitpack.io'
   }
}

dependencies {
   // other dependencies

   implementation 'com.github.BitBurst-GmbH.bitlabs-android-library:core:5.0.0'

   // other dependencies
}
repositories {
maven("https://jitpack.io")
}
dependencies {
// other dependencies
implementation("com.github.BitBurst-GmbH.bitlabs-android-library:core:5.0.0")
// other dependencies
}Allowing your App to access the internet
If your app doesn't have this already, make sure to allow access to the internet.
//App Permissions
<uses-permission android:name="android.permission.INTERNET" />
Offerwall
You can create multiple Offerwall instances with different tokens.
val offerwall = BitLabs.OFFERWALL.create("APP_TOKEN", "UID")

val anotherOfferwall = BitLabs.OFFERWALL.create("OTHER_APP_TOKEN", "UID")
Add Tags
You can add tags that you receive in your server callbacks.
offerwall.tags["is_premium"] = true
offerwall.tags["my_tag"] = "new_user"
Add Additional Parameters
You can add these parameters to modify your Offerwall.
offerwall.options["theme"] = "dark"
Helpful)You can find a list of existing parameters [here.](https://developer.bitlabs.ai/docs/iframeweb-integration#optional-parameter
Listeners
OnSurveyRewardListener
This listener is triggered every time a user earns reward from a survey regardless of whether it's a screenout or a complete.
offerwall.onSurveyRewardListener = OnSurveyRewardListener { reward ->
    // implementation
}
OnOfferwallClosedListener
This listener is triggered every time the user exits the Offerwall.
offerwall.onOfferwallClosedListener = OnOfferwallClosedListener { reward ->
	// implementation
}
Launch the Offerwall
offerwall.launch(activityContext)Deep Links
These are helper methods to launch the Offerwall directly into the needed offer. If the offer doesn't exist it will fall back to the home page of the Offerwall.
To a specific Offer:
offerwall.openOffer(context, offerId)To a specific Magic Receipts Offer:
offerwall.openMagicReceiptsOffer(context, offerId)To a specific Magic Receipts Merchant:
offerwall.openMagicReceiptsMerchant(context, merchantId)API
If you don't want to use the Offerwall, but still want to use the BitLabs API, you can initialise it this way:
BitLabs.API.init("APP_TOKEN", "UID")checkSurveys
Check whether this user has any survey available. The response hasSurveys is a boolean.
BitLabs.API.getSurveys({ hasSurveys ->
	// implementation
}, { exception ->
	// error handling
)
getSurveys
Get the list of all surveys for this user. The response surveys is a List<Survey>
BitLabs.API.getSurveys({ surveys ->
	// implementation
}, { exception ->
	// error handling
)
The Survey object:
| Property | Type | Description |
|---|---|---|
| networkId | Int | The id of the Network this survey belongs to. |
| id | Int | The id of the Survey. |
| cpi | String | CPI of this survey in USD without any formatting applied. |
| value | String | CPI formatted according to your app settings. Can be shown to the user directly. |
| loi | Double | Assumed length of the survey in minutes. |
| remaining | Int | Amount of users that can still open the survey |
| details | Details(Category(name: String, IconUrl: String)) | The details of the category this Survey is classified in. |
| rating | Int | Difficulty ranking of this survey. 1-5 (1 = hard, 5 = easy). Minimum value is 1, maximum value is 5. |
| link | String | This link can be used as is to open the survey. All relevant details are inserted on the server. |
| missingQuestions | Int? | The amount of questions that have to be answered before the survey is guaranteed to be openable by the user. |
| open() | Function | A function which opens the Offerwall. |
Initialising the SDK (Deprecated)
You must initialise the SDK before you can use it. You can do so with the following code.
BitLabs.init(<Context>, "YOUR-TOKEN", "YOUR-USER-ID");BitLabs.INSTANCE.init(<Context>, "YOUR-TOKEN", "YOUR-USER-ID");The <Context> is used to get the device Advertising Id to support BitLabs Offers. This is where you will need the API key from the dashboard, as you will need to replace "YOUR-TOKEN" with it. For "YOUR-USER-ID", you will need to dynamically insert the user id for each app user. Make sure the id used here is unique and that it does not change, as the user's profile will be stored under this id.
You can also hold the reference of
BitLabs.INSTANCEin a global or local variable like this:BitLabs bitLabs = BitLabs.INSTANCEAnd now you can use the library as
bitLabs.init(<Context>, "YOUR-TOKEN", "YOUR-USER-ID");
Flags (Deprecated)
You can use different flags in order to customize the SDK experience.
| Flag | Description |
|---|---|
| BitLabs.supportEdgeToEdge | false: Removes the Android safe area insets. |
Using the SDK (Deprecate)
Show the Offer Wall to the user
Now it's time to use the BitLabs SDK so that your users can start taking surveys. Call the .launchOfferWall() function to open the Offer Wall/Direct Link. BitLabs will show up and the user will see qualifications or surveys.
BitLabs.launchOfferWall(<Context>)BitLabs.INSTANCE.launchOfferWall(<context>)The <Context> here can be the context of an Activity or of the Application.
That's it!Theoretically, this is all you have to do. Anything below is optional but can improve the user experience.
Check For Surveys - Check if there's something to do for the user
You can use .checkSurveys(onResponseListener, onErrorListener) to check if a survey is available for the user. The onResponseListener callback will return true whenever there's a survey or a qualification question available for the user. Otherwise, it will return false.
BitLabs.checkSurveys(
  { hasSurveys -> Log.i(<TAG>, if (hasSurveys) "Found Surveys" else "No Surveys") },
  { e -> Log.e(<TAG>, "CheckSurveysErr: ${e.getMessage()}", e.getCause()) }
)
BitLabs.INSTANCE.checkSurveys(
hasSurveys -> Log.i(TAG, hasSurveys ? "Found Surveys" : "No Surveys"),
e -> Log.e(TAG, "CheckSurveysErr: " + e.getMessage(), e.getCause())
);In case an error has occurred, the onError callback will be triggered instead of onResponse. So, make sure to implement it to know what kind of error occurred.
Get Surveys Natively
You can use .getSurveys(onResponseListener, onErrorListener) to get available surveys for the user.
BitLabs.getSurveys(
  { surveys -> Log.i(<TAG>, "Surveys: $surveys") },
  { exception -> Log.e(TAG, "GetSurveysErr: ${exception.getMessage()}", exception.getCause()) }
)
BitLabs.INSTANCE.getSurveys(
surveys -> Log.i(<TAG>, "Surveys: " + surveys),
exception -> Log.e(<TAG>, "GetSurveysErr: " + exception.getMessage(), exception.getCause())
);The onResponseListener callback's parameter is a list of Surveys. A Survey has the following properties:
| Property | Type | Description |
|---|---|---|
| networkId | Int | The id of the Network this survey belongs to. |
| id | Int | The id of the Survey. |
| cpi | String | CPI of this survey in USD without any formatting applied. |
| value | String | CPI formatted according to your app settings. Can be shown to the user directly. |
| loi | Double | Assumed length of the survey in minutes. |
| remaining | Int | Amount of users that can still open the survey |
| details | Details(Category(name: String, IconUrl: String)) | The details of the category this Survey is classified in. |
| rating | Int | Difficulty ranking of this survey. 1-5 (1 = hard, 5 = easy). Minimum value is 1, maximum value is 5. |
| link | String | This link can be used as is to open the survey. All relevant details are inserted on the server. |
| missingQuestions | Int? | The amount of questions that have to be answered before the survey is guaranteed to be openable by the user. |
| open() | Function | A function which opens the Offerwall. |
Native Survey Widgets (DEPRECATED)
getSurveyWidgets (DEPRECATED)
You can use .getSurveyWidgets(<Context>, List<Survey>, WidgetType) to get a RecyclerView of survey widgets.
// If you have a layout, you can add the RecyclerView as shown below
// Note: `this` is the Activity context, and `surveys` is a List<Survey> variable.
layout.addView(bitlabs.getSurveyWidgets(this, surveys, WidgetType.SIMPLE))
// If you have a layout, you can add the RecyclerView as shown below
// Note: `this` is the Activity context, and `surveys` is a List<Survey> variable.
layout.addView(bitlabs.getSurveyWidgets(this, surveys));The WidgetType can be one of three options:

showSurvey
You can use .showSurvey(<FragmentActivity>, <ContainerResId>, WidgetType) to show the Survey Widget Fragment inside the container provided.
- FragmentActivity: The Activity where the container exists.
- ContainerResId: The Resource Id that you added to the container where the Fragment will appear. You have to create this container in your Activity layout to let the SDK know where to render the Widget. It can be a normal
VieworFragmentContainer - WidgetType: The type in which the Survey Widget will appear as. There are three main types for now.
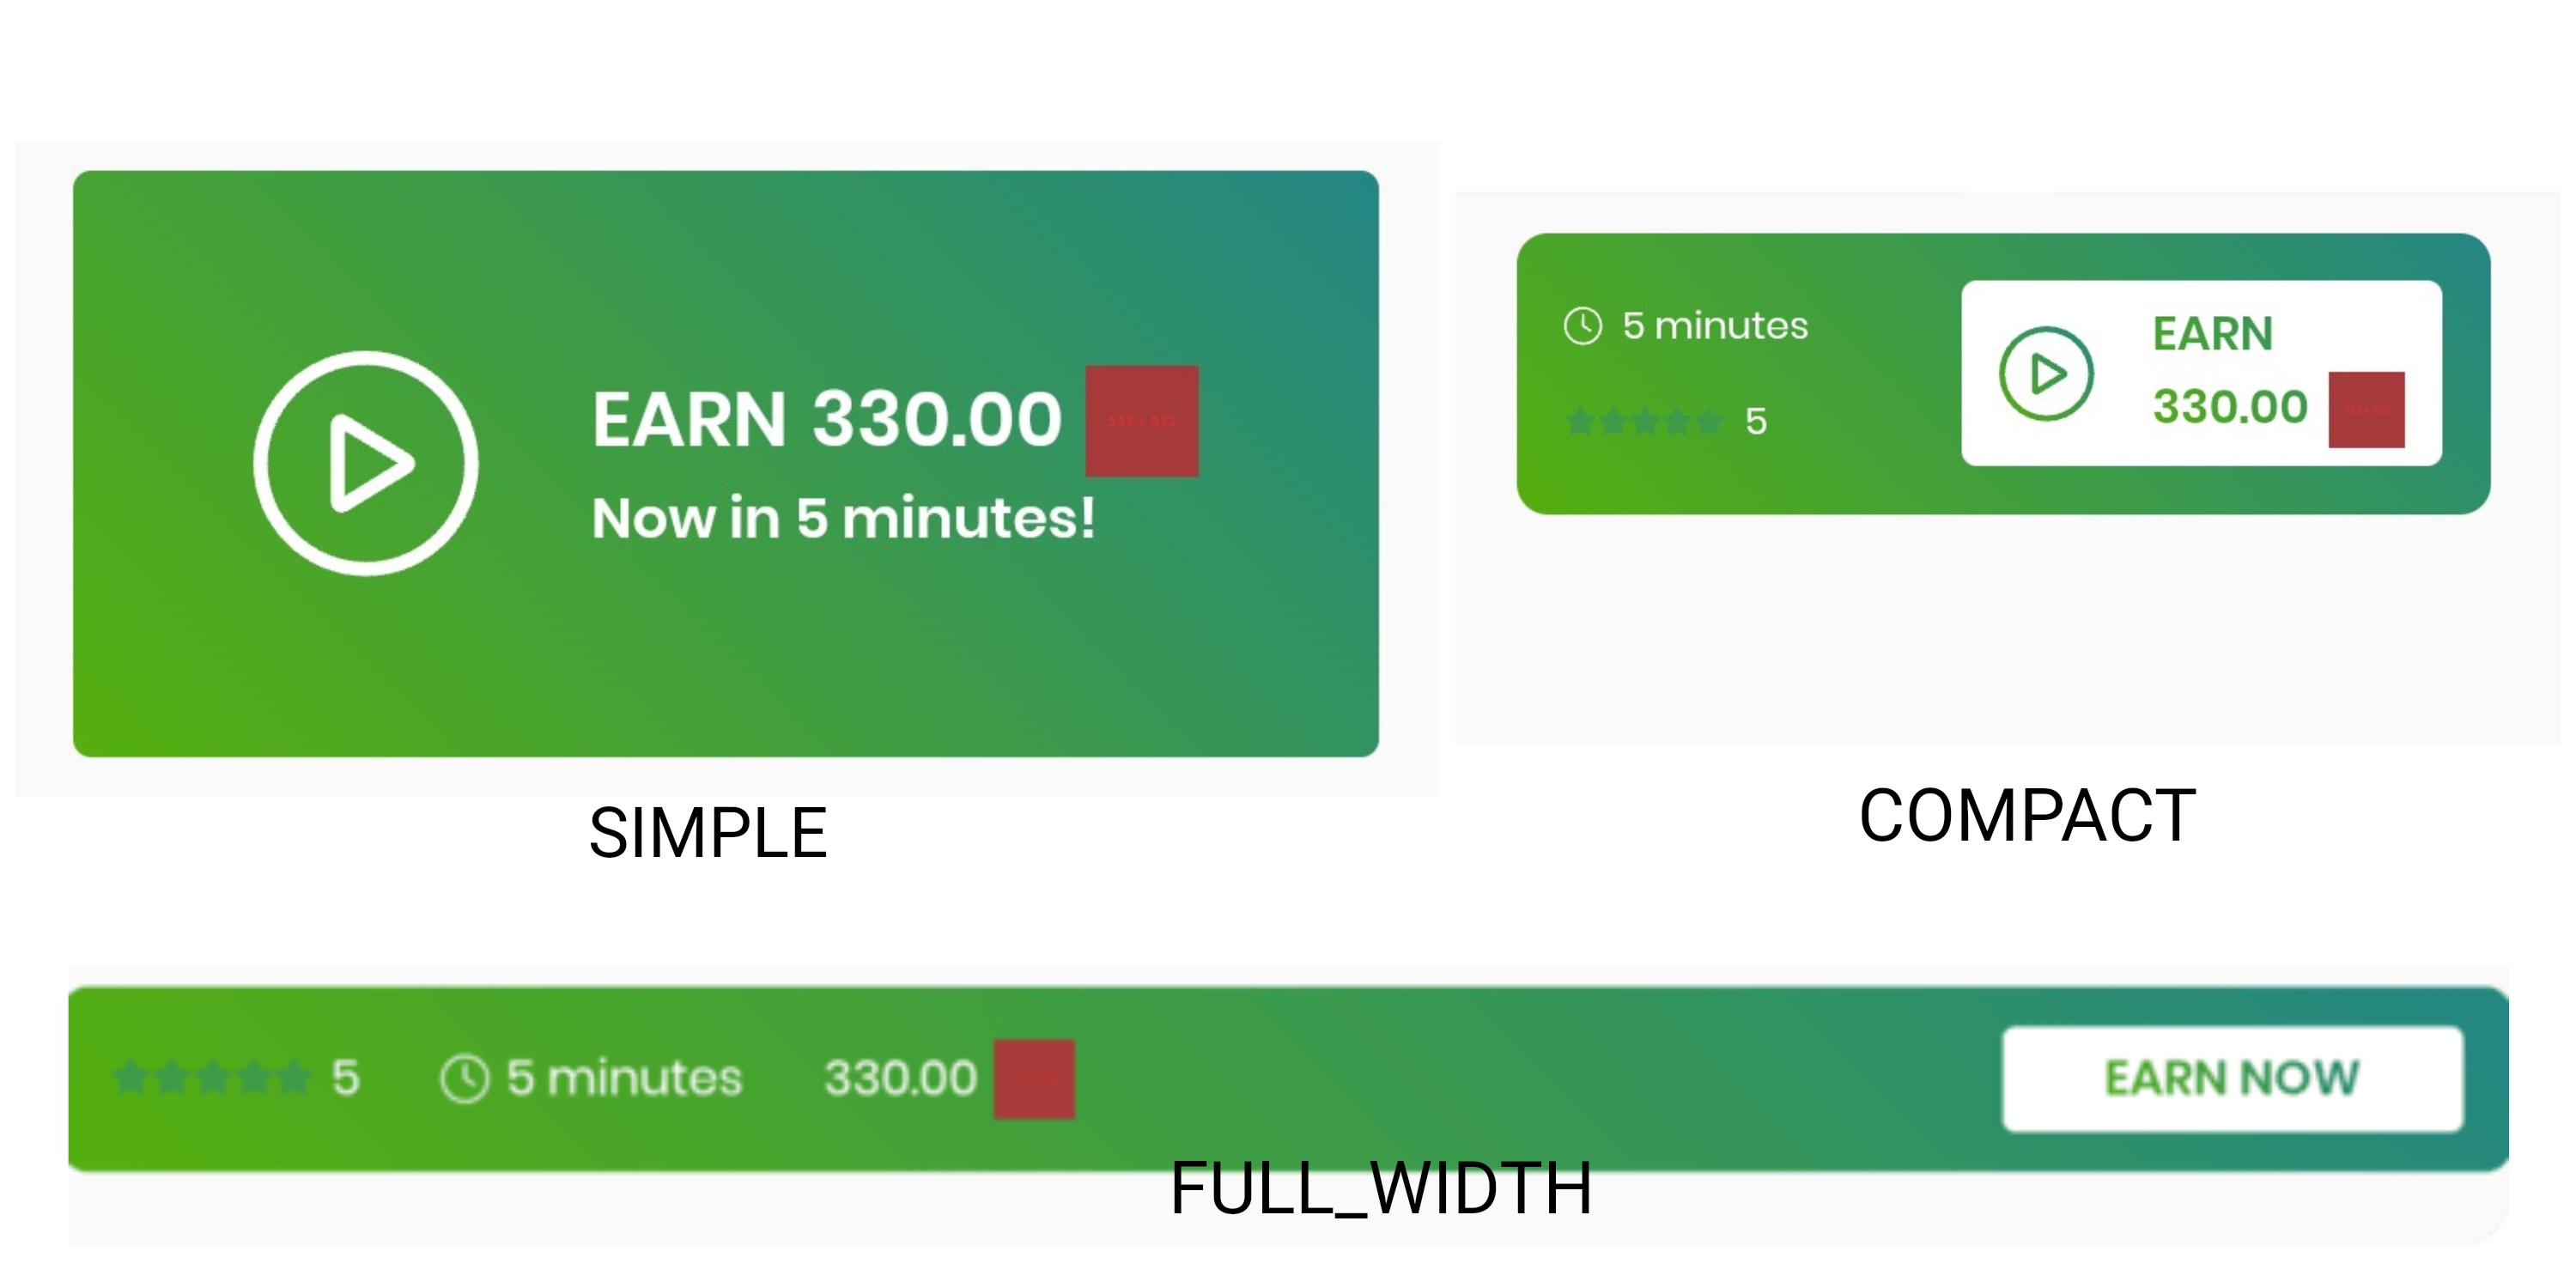
// This usage assumes that the method is being called from within a class
// that is of/inherits from type FragmentActivity
BitLabs.showSurvey(this, R.id.container_survey_widget, WidgetType.SIMPLE)
// This usage assumes that the method is being called from within a class
// that is of/inherits from type FragmentActivity
BitLabs.INSTANCE.showSurvey(this, R.id.container_survey_widget, WidgetType.SIMPLE)Reward Listener - Client Side Callbacks (Deprecated)
You can use .setOnRewardListener(onRewardListener) to set callback which receives the reward of the user and executes the behaviour you specify.
BitLabs.setOnRewardListener { payout -> Log.i(<TAG>, "Payout of: ${payout}") }BitLabs.INSTANCE.setOnRewardListener(payout -> Log.i(<TAG>, "Reward payout: " + payout));This callback is invoked when the user leaves the Offer Wall, and the payout is the total reward the user got since the Offer Wall is opened until it is closed.
Currently, the SDK callbacks only work with surveys. For offers, please use the server-to-server callback instead.
We highly recommend using server-to-server callbacks instead! Please do not use this in apps where the user can withdraw real currency, as it might be exploitable.
However, if your app stores user data locally and does not sync with a server, this would be an option to still use BitLabs to reward your users.
Parameters (Deprecated)
You can use .setTags(tags) to pass additional parameters to the OfferWall. The tags parameter is a HashMap<String, Object>.
val tags = mutableMapOf<String, Any>()
tags["display_mode"] = "offers"
tags["theme"] = "DARK"
BitLabs.tags = tags
Map<String, Object> tags = new HashMap<>();
tags.put("my_tag", "new_user");
tags.put("is_premium", true);
BitLabs.INSTANCE.setTags(tags);
Setting a new Map of Tags will replace the old ones.
Add a Parameter (Deprecated)
Use addTag(key, value) if you want to append new tags to an already existent Map of tags which you already set earlier.
BitLabs.addTag("display_mode", "offers")
BitLabs.addTag("theme", "DARK")
BitLabs.INSTANCE.addTag("my_tag", "new_user");
BitLabs.INSTANCE.addTag("is_premium", true);
HelpfulYou can find a list of existing parameters here.
Leaderboard (Deprecated)
The Leaderboard widget shows your top 100 earning users and their corresponding earnings in your app's currency. And will open the Offerwall if clicked.
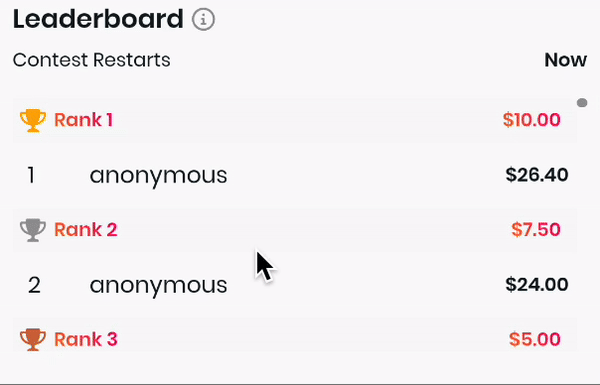
Reward
The rewards shown in the widget are custom to your app and will be paid by us to you and your users. By default these rewards are disabled and not shown so this widget only serves the purpose to display the best earning users. To enable the rewards and incentivise your users to do more surveys and offers in your app please contact us on: [email protected]
The earnings will reset at the end of each month and the top 100 users will get their corresponding reward. If a user is listed in the leaderboard it will see it's rank by the blue (You) besides the username.
All earnings and rewards in the leaderboard will be formatted as your app's settings set on our publisher dashboard.
Username
If you implement the leaderboard without updating your offerwall and widget integration all users will just be called anonymous. To pass us the correct usernames to your provided user id you will have to add a tag with key username before launching the offerwall.
Implementation
getLeaderboard (DEPRECATED)
You can use getLeaderboard(onResponseListener) to get a LeaderboardFragment which you can add to any view in your Activity.
BitLabs.getLeaderboard {
	it?.let { leaderboardFragment ->
		context.supportFragmentManager
			.beginTransaction()
			.add(R.id.fragment_container_view_tag, leaderboardFragment)
			.commit()
	}
}
BitLabs.INSTANCE.getLeaderboard(leaderboardFragment -> {
if (leaderboardFragment == null) return;
getSupportFragmentManager()
.beginTransaction()
.add(R.id.fragment_container_view_tag, leaderboardFragment)
.commit();
});showLeaderboard
You can use showLeaderboard(<FragmentActivity>, <ContainerResId>) to show the Leaderboard Widget Fragment
- FragmentActivity: The Activity where the container exists.
- ContainerResId: The Resource Id that you added to the container where the Fragment will appear. You have to create this container in your Activity layout to let the SDK know where to render the Widget. It can be a normal
VieworFragmentContainer
// This usage assumes that the method is being called from within a class
// that is of/inherits from type FragmentActivity
BitLabs.showLeaderboard(this, R.id.container_leaderboard)
// This usage assumes that the method is being called from within a class
// that is of/inherits from type FragmentActivity
BitLabs.INSTANCE.showLeaderboard(this, R.id.container_leaderboard)Whitelist HTTP Domains
Since BitLabs works with a plethora of survey providers, we can't always make sure that the domains are secured with HTTPS schemes. So we had to whitelist some providers.
If you want to remove or add a domain to the list:
- Download the network_security_config.xml
- Put the downloaded file inside ctRootDirectory]/andro/android/app/src/main/res/xml/
- Now you can add or remove to it any domain you want.
Complete the Google Play Data Safety questionnaire
Once you are ready to launch your app, you should adjust the Google Play Data Safety questionnaire in order to get your app published on Google Play. Read about it here: https://developer.bitlabs.ai/docs/complete-the-google-play-data-safety-questionnaire
Updated 3 months ago
Your next Step
You have now implemented BitLabs with your project. If you haven't done it already, it is time to configure server-to-server callbacks and the look and feel of your app.